
Docker is an open-source project that enables a Linux application along with its dependencies to be packaged as a container. This helps enable flexibility and portability around where an application can be run and served.
These dedicated low level “containers” also improve performance and overhead through using resource isolation features of the Linux kernel. On a large scale level its strength comes from the automation and deployment of software applications and services.
This post covers the fundamentals of Docker and aims to demonstrate how to understand and work with the basics using the Linux command line.
1 – Installing Docker
The first “main method” in this step should always ensure you have an up to date version of Docker installed on your system, and is the recommended route to installing Docker. It uses an install script from one of their official domains, and is suggested by the developers.
Main Method
“Docker requires a 64-bit installation regardless of your Debian/Ubuntu version. Additionally, your kernel must be 3.10 at minimum. The latest 3.10 minor version or a newer maintained version is also acceptable.”
Install using either:
[alert-announce]
- $ wget -qO- https://get.docker.com/ | sh
[/alert-announce]
Or:
[alert-announce]
- $ curl -sSL https://get.docker.com/ | sh
[/alert-announce]
Then start the docker service:
Arch Linux
[alert-announce]
- $ sudo systemctl start docker
- $ sudo systemctl enable docker
[/alert-announce]
Debian / Ubuntu
[alert-announce]
- $ sudo service docker start
[/alert-announce]
Package Managers Method
It’s advised to use the first “main method” of installing Docker in order to always install the latest version, and not to use the build packages included in your Linux system’s package manager.
Here’s how to use up to date package versions manually if you do wish to do so however.
Arch Linux
Using pacman package manager:
[alert-announce]
- $ sudo pacman -S docker
[/alert-announce]
Using an Aurum helper like Yaourt you can get access to another package that is built off of the Docker Git master branch:
[alert-announce]
- $ sudo yaourt -S docker-git
[/alert-announce]
Remember to start the docker service:
[alert-announce]
- $ sudo systemctl start docker
- $ sudo systemctl enable docker
[/alert-announce]
More information can be found at:
Debian
For Debian to get an up to date version of Docker you must add and update the apt repository by following the steps here:
Then run:
[alert-announce]
- $ sudo apt-get update
- $ sudo apt-get install docker-engine
- $ sudo service docker start
[/alert-announce]
Ubuntu
For Ubuntu to get an up to date version of Docker you must add and update the apt repository, and set up any of the relevant “prerequisites” by following the steps here:
Then run:
[alert-announce]
- $ sudo apt-get update
- $ sudo apt-get install docker-engine
- $ sudo service docker start
[/alert-announce]
2 – Docker User Group
After installing Docker a message is returned that reads:
[alert-announce]
Output
- If you would like to use Docker as a non-root user, you should now consider
adding your user to the “docker” group with something like: - sudo usermod -aG docker <username>
- Remember that you will have to log out and back in for this to take effect!
[/alert-announce]
This if followed allows you to run Docker as a non-root user; with the user you add to the group. While this may seem like a great idea, be aware of the potential implications involved in adding users to this group.
The Docker daemon requires root privileges to carry it out its work, so only trusted users and user accounts should be added to this group and given control of the Docker daemon.
Read this page on Docker security for reasoning and a better explanation of why this is potentially a security risk:
Once you understand this if you want to add your Linux user to the Docker group use the next command.
Where scarlz is replaced by the username you wish to add.
[alert-announce]
- $ sudo usermod -aG docker scarlz
[/alert-announce]
- Now log out and back into your Linux system.
The rest of this tutorial assumes your are entering the commands in each step as a user that has been added to the docker group. IF you did not do this simply append sudo to each Docker command where necessary.
3 – Containers & Images
https://www.youtube.com/watch?v=klzLdzpPcQw
Docker uses the concept of containers to provide the benefits and functionality mentioned in the preamble. A container is a very lightweight bare-bones stripped version of an operating system (Linux OS). Only containing the necessary essential parts for whatever purpose it needs to server.
Images are loaded into a container and are the service or program you want to be run as a docker process. This could be anything from personally created custom images to official web servers, databases, etc. The official images of these are held by “Docker Hub” which is explained more in an upcoming section.
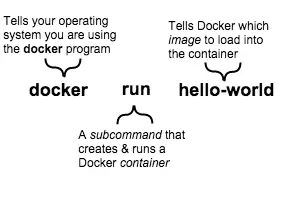
Enter this command to run an example “hello world” image in a Docker container:
[alert-announce]
- $ docker run hello-world
[/alert-announce]
This is what the hello-world image should have output:
[alert-announce]
- Hello from Docker.
- This message shows that your installation appears to be working correctly.
- To generate this message, Docker took the following steps:
- 1. The Docker client contacted the Docker daemon.
- 2. The Docker daemon pulled the “hello-world” image from the Docker Hub.
- 3. The Docker daemon created a new container from that image which runs the
- executable that produces the output you are currently reading.
- 4. The Docker daemon streamed that output to the Docker client, which sent it
to your terminal. - To try something more ambitious, you can run an Ubuntu container with:
- $ docker run -it ubuntu bash
- Share images, automate workflows, and more with a free Docker Hub account:
- https://hub.docker.com
- For more examples and ideas, visit:
- https://docs.docker.com/userguide/
[/alert-announce]
Here’s also what happened internally with the previous command:
- Docker checked to see if the
hello-worldsoftware image was present on the host machine’s local file-system. - The
hello-worldimage was not found so Docker downloaded the image from Docker Hub. - After it finished downloading it was then loaded as an image into a container and “run” successfully.
Images can be very simple (like this one) or can be designed to carry out more complex high-level tasks.
It can also be tempting to think of containers as “lightweight” virtual machines, and although this is generally a good analogy to some small degree, it does not account for and explain everything Docker containers are about.
4 – Docker Hub
Who built the “hello-world” software image? Docker did, but anyone can and is welcome to contribute to the online catalogue of Docker images known colloquially as Docker Hub.
The Docker Hub houses most of the more familiar and popular software and services you’re accustomed to. We will look one or two of these later.
For now pull a second example image from Docker Hub by typing into the search-bar whalesay on the Docker Hub website, and then finding the official docker/whalesay image.
The page for it looks like this:
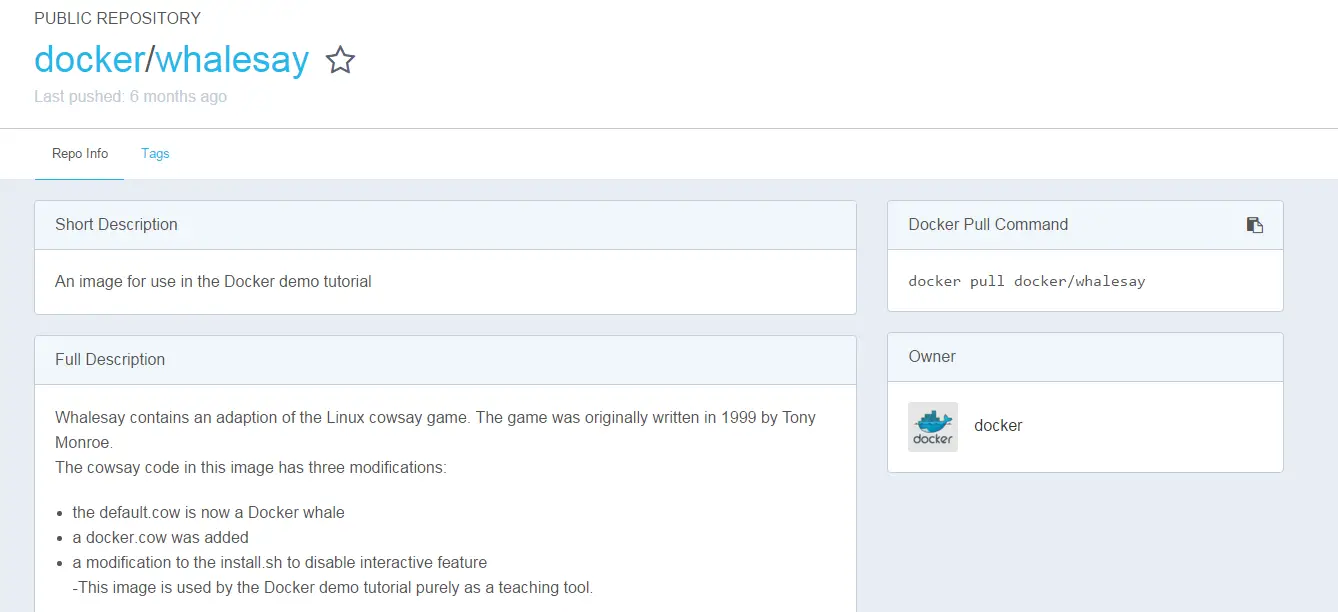
Image descriptions pull commands, instructions, and owners are always listed here for any type of image.
Run the command as shown by the page:
[alert-announce]
- $ docker run docker/whalesay cowsay boo
[/alert-announce]
Which runs the image in a container resulting in:
[alert-announce]
Output
- Unable to find image ‘docker/whalesay:latest’ locally
- latest: Pulling from docker/whalesay
- 2880a3395ede: Pull complete
- 515565c29c94: Pull complete
- 98b15185dba7: Pull complete
- 2ce633e3e9c9: Pull complete
- 35217eff2e30: Pull complete
- 326bddfde6c0: Pull complete
- 3a2e7fe79da7: Pull complete
- 517de05c9075: Pull complete
- 8f17e9411cf6: Pull complete
- ded5e192a685: Pull complete
- Digest: sha256:178598e51a26abbc958b8a2e48825c90bc22e641de3d31e18aaf55f3258ba93b
- Status: Downloaded newer image for docker/whalesay:latest
_____
< boo >
—–
\
\
\
## .
## ## ## ==
## ## ## ## ===
/””””””””””””””””___/ ===
~~~ {~~ ~~~~ ~~~ ~~~~ ~~ ~ / ===- ~~~
\______ o __/
\ \ __/
\____\______/
[/alert-announce]
Furthermore here’s the dockerfile (configuration file) for the whalesay image we just ran:
[alert-announce]
Output
- FROM ubuntu:14.04
- # install cowsay, and move the “default.cow” out of the way so we can overwrite it with “docker.cow”
- RUN apt-get update && apt-get install -y cowsay –no-install-recommends && rm -rf /var/lib/apt/lists/* \
- && mv /usr/share/cowsay/cows/default.cow /usr/share/cowsay/cows/orig-default.cow
- # “cowsay” installs to /usr/games
- ENV PATH $PATH:/usr/games
- COPY docker.cow /usr/share/cowsay/cows/
- RUN ln -sv /usr/share/cowsay/cows/docker.cow /usr/share/cowsay/cows/default.cow
- CMD [“cowsay”]
[/alert-announce]
it’s also possible to search for images by keyword from the command line:
[alert-announce]
- $ docker search ubuntu
[/alert-announce]
This like the website search shows you a list of the currently available public repositories on the Docker Hub which match the provided keyword.
Some final considerations for Docker Hub are:
- You can sign up for a free Docker Hub account to upload your own Docker images. Private repositories for organisation wide images also exist.
- Automated Builds allow you to auto-create new images when you make changes to a targeted source, GitHub repo, or Bitbucket repo.
- Inbuilt webhooks let you trigger actions after a successful push to a repository (or successful automated build).
- General GitHub and Bitbucket integration adds the Hub and Docker images to your current workflows.
5 – Running Docker Containers
In this step, there are more containers to be run alongside the specifics of how Docker command structures work.
To start with a run yet another example command:
[alert-announce]
- $ docker run ubuntu:14.04 /bin/echo ‘Hello world’
[/alert-announce]
In this last command docker run starts us off by creating a brand new container, just like before. Then the image we asked for is this time not just a program/service but ubuntu:14.04 – an entire Linux OS environment. Bear in mind the quote from earlier!
As we don’t have this Docker image (it’s still classed and used as an image by Docker) it must be downloaded from Docker Hub.
After this we asked Docker to run a shell command inside the new container’s environment, which was:
/bin/echo "Hello World"
We then saw the result of this whole sequence as output on the command line.
[alert-announce]
Output
- Hello world
[/alert-announce]
Docker containers only run as long as the command you specify is active. So as soon as Hello World was echoed, the container stopped.
Try this new command that has some options and calls a shell.
[alert-announce]
- $ docker run -t -i ubuntu:14.04 /bin/bash
[/alert-announce]
The -t option assigns/begins a pseudo-tty or terminal inside the new container.
The -i option allows us to make an interactive connection by grabbing the standard in (STDIN) of the container.
Which as we’ve called bash shell will take us to a bash command prompt inside of the container.
The usual commands will work in this shell and file-system. It’s just a contained version of a regular Ubuntu OS environment.
Use exit or CTRL + D to end the session, thereby also ending and stopping this container.
Although these are useful examples most of the time it’s more likely and common you’ll use Docker with “daemonised” programs or services.
Here’s how this looks with the “Hello World” example:
[alert-announce]
- $ docker run -d ubuntu:14.04 /bin/sh -c “while true; do echo hello world; sleep 1; done”
[/alert-announce]
The differences here are the command line options and do while loop.
The -d option tells Docker to run the container but put it in the background, to “daemonise” it. The loop contains a command that permanently echoes “hello world” into the container with a short delay in between.
You will have noticed that as it’s been daemonised, instead of seeing any output, a long string comprised of digits and numbers has been returned:
[alert-announce]
Output
- f54eb8a426307e63684040eee69e0a6cf43859bee08c3f6a9086b195213df052
[/alert-announce]
This is known as a container ID; it uniquely identifies a container instance so we can work with it.
This next step shows how you can monitor, examine, and find out what’s going on inside of daemonised containers.
6 – Docker CLI Client
We can use the container ID to see what’s happening inside of our daemonised hello world container.
First let’s list all of the currently running containers and their details:
[alert-announce]
- $ docker ps
[/alert-announce]
The docker ps command queries the Docker daemon for information about all the containers it has tied to it.
[alert-announce]
- CONTAINER ID IMAGE COMMAND CREATED STATUS PORTS NAMES
- f54eb8a42630 ubuntu:14.04 “/bin/sh -c ‘while tr” 11 minutes ago Up 10 minutes amazing_jepsen
[/alert-announce]
Note the shortened container ID in the first column, and the auto-assigned name in the end column.
To check on the inner workings of the container and see if our earlier “hello world” loop is still running use:
[alert-announce]
- $ docker logs amazing_jepsen
[/alert-announce]
Note: You can use either the container ID or name as a parameter.
The output confirms it’s working as intended:
[alert-announce]
- hello world
- hello world
- hello world
- hello world
- hello world
- hello world
- hello world
- hello world
- hello world
- hello world
- hello world
- hello world
- hello world
- hello world
[/alert-announce]
Lastly for this, stopping and ending a container is achieved by using:
[alert-announce]
- $ docker stop amazing_jepsen
[/alert-announce]
Autocomplete works for this last command too when entering the name.
To start the container again simply replace stop in the last command with start . Or to delete the container entirely use:
[alert-announce]
- $ docker rm amazing_jepsen
[/alert-announce]
Note: Removing a container is permanent, once it’s deleted it’s gone.
So the container from before is now gone. The Ubuntu image we have been using is still present on the system however.
To see images that have been downloaded and still present enter:
[alert-announce]
- $ docker images
[/alert-announce]
Which will give a similar output to:

To delete and remove images use this command with the image name as a parameter e.g.
[alert-announce]
- $ docker rmi ubuntu:14.04
[/alert-announce]
Autocomplete works for the image names and multiple names can be passed as parameters.
A successful deletion gives output similar to:
[alert-announce]
Output
- Untagged: ubuntu:14.04
- Deleted: 89d5d8e8bafb6e279fa70ea444260fa61cc7c5c7d93eff51002005c54a49c918
- Deleted: e24428725dd6f8e354a0c6080570f90d40e9e963c6878144291c6ba9fd39b25f
- Deleted: 1796d1c62d0c3bad665cc4fbe4b6a051e26c22f14aa5e0e2490e528783764ca0
- Deleted: 0bf0561619131d3dc0432a2b40a9438bd48f4a84e89ff128cc5147a089c114e4
[/alert-announce]
If an error message is returned claiming another container is using the image as a reference and you know this is not true.
Try using the -f force option with the rmi removal command:
[alert-announce]
- $ docker rmi -f ubuntu:14.04
[/alert-announce]
With this we complete the cycle of downloading, creating, and removing an image and its containers.
Docker is an amazing step forward in the world of virtualisation and resource efficiency, but these examples here are for demonstration purposes only, and are meant to teach the basics. As much as possible try to to think of how this concept could benefit a large hosting provider, or business that serves web applications to many.
Post number two on Docker goes into more detail on administering and handling containers. With some examples of real services and apps running under Docker.